For many reasons, you may want to convert your blog post to a video.
I’ve been there before, so I figured out a way to do it.
In this article, I’ll share with you how to easily convert your blog post to a video. The good part is that it is easy and you do not even have to be in front of the camera.
However, before going further, it’s important to know why converting blog posts to videos is important.
Contents
Why Converting Blog Post to A video Is Important
There are many reasons why converting blog posts is important. Consider some of them:
1. Videos are more powerful than texts
In today’s digital world, videos are so effective for learning.
According to Wyzowl, 94% of marketers say video has helped them increase their understanding of products or services.
This can be the same for you only if you have more videos embedded in your blog post.
Also, in my recent study, I found out that videos are more important to SEO than images.
Therefore, there is a need to take advantage of this powerful resource in your content marketing strategy.
1. Repurposing your content
Repurposing content is one good strategy in content marketing.
In this case, repurposing your blogpost to videos provides additional diversity to your content.
In addition, repurposing your content provides more formats of your content.
2. Readers Stay longer on site
Converting your blog post to a video helps your reader to stay longer on your site and could effectively reduce bounce rate.
Imagine you have an “how to” content and you have a video summary embedded in the article. Other readers who may prefer videos would watch it on your site.
Hence, readers would stay longer on your site and thereby improve your average session time.
3. Giving your audience options
By converting your blog post to video, you are providing your audience with more options than what a regular post would provide.
Most readers learn faster from videos while others are content with reading.
Whichever category your reader falls under, having videos in your blog post would cater to both types of audiences.
4. More Value to Your Audience
Valuable content is always the watchword in content marketing.
When you convert your blog post to videos, you are providing more value to your audience.
5. Reaching more audience on other platforms
While your blog content remains on your blog, converting it to video means that it will be in another format.
As we know today, YouTube is the biggest video search engine.
So, with your videos published on YouTube, you are reaching more audiences on the platform different from those you already have.
This is applicable to other Video platforms apart from YouTube.
6. External traffic source
Assuming you already have published your video on another platform like YouTube, viewers who are curious enough to know more about your video would likely click the link to your original blog post.
Hence, you have multiple channels of traffic.
7. Additional Monetization opportunity
It is no news that videos can be monetized.
For example, you can monetize YouTube video content with Google AdSense.
Other display ad networks like Ezoic can help you get the best out of your video content.
(Learn all the various opportunities to monetize your blog.)
Convert Blog Post To A Video in 3 Easy Steps
Now that you know the importance of converting blog posts to video content, now is the time to learn how to do it.
Although there are many ways to convert blog posts to videos, I’ll show you the easiest method that works for me.
This method is super easy and does not require any technical or video editing background.
In fact, a complete novice should be able to convert a blog post to a video after reading this article.
Step 1: Choose a video to convert
The very first step is to choose which video to convert.
This step is important especially when you have so many blog posts. You may wonder; which should I start with?
To help you decide what blog post to convert, consider the following:
1. Posts you already rank for
The best posts to convert are those content you already rank for.
Why? If these posts are ranking already on the Search Engines, there are chances that your videos would rank too with the same keywords.
On Google, for example, there is a separate section for video search results. It is in this section your videos on YouTube would show up.
Also, you can track how much traffic you are getting from videos in your Google Search console.
2. Most detailed posts
Another thing to consider when deciding which post to convert to video is your most informative post.
In WordPress, this could be called “cornerstone content”.
It is important to convert these kinds of posts to videos because they are the most important or most informative of your content.
Another reason is that some readers may prefer to watch videos instead of reading a very lengthy post.
Having considered these two factors, you must have selected blog posts to convert to videos.
Hint: Learn how long your blog post should be.
Step 2: Create video
To convert blog posts to videos, you’ll need to create an account on Lumen5.
Lumen5 is a powerful online tool that helps you to easily convert texts to videos.
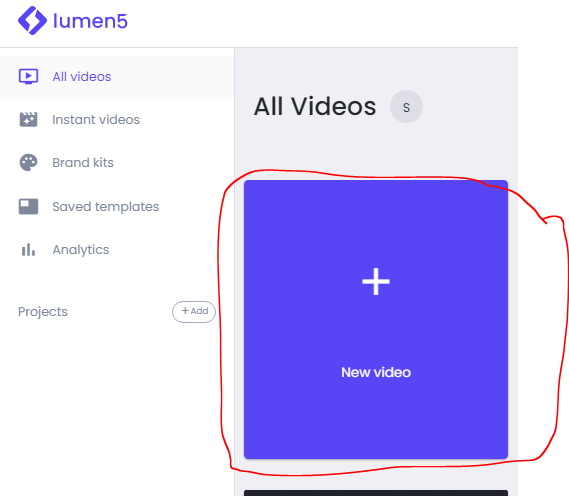
Assuming you have created an account, go to your account dashboard and click “new video”.
Next, you need to select one template out of the numerous inbuilt templates.
Really, all templates are customizable, so you can go with any one of them.
If you are looking to publish on YouTube, you should select the 16:9 video format.
Click the “use template” button.
Next, you’ll see the video creation dashboard:
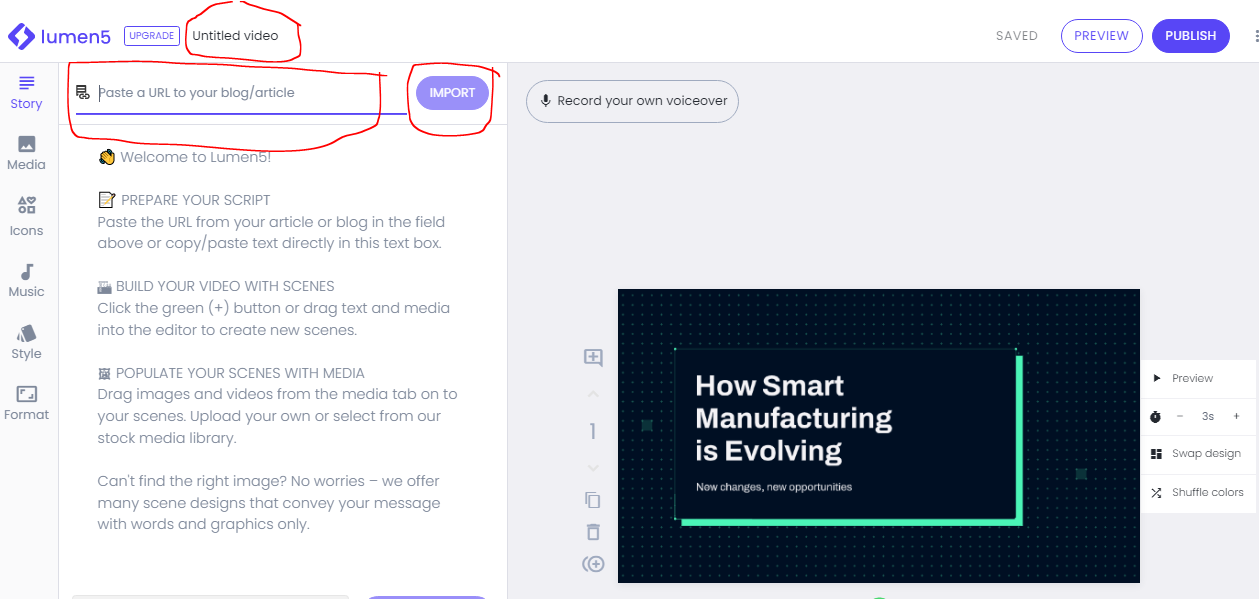
Next, you need to do 3 things:
- Paste the link to your chosen blog post
- Click Import to fetch the texts in your posts to Lumen5.
- Rename the title of your video
At this point, the texts in your content are imported to Lumen5.
Here is a word of caution: do not click on “convert to video”.
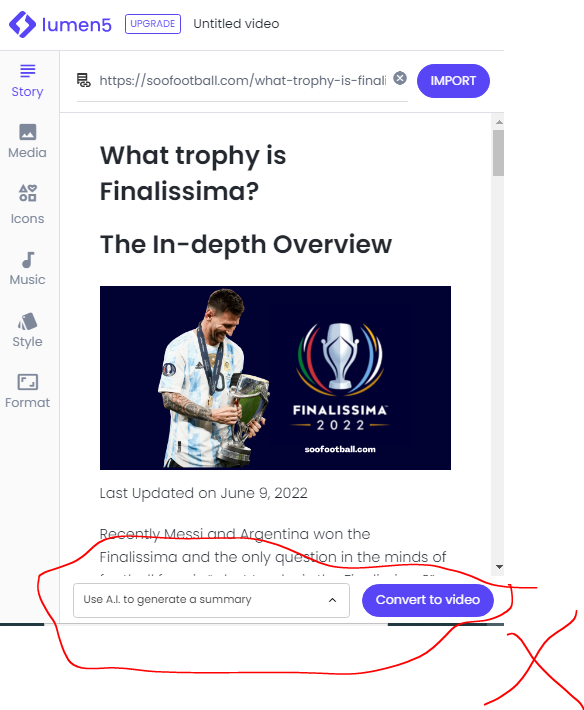
Clicking it would mean that Lumen5 AI would have to decide on your behalf which paragraphs or subheadings would be converted to a scene in your video.
Most times, the selected scenes are not the most important.
Remember, your goal in creating the video in the first place is to summarise the main points in your article. You do not need to convert every single paragraph in your blog post to a scene in your video.
What to convert to a video scene in your content
- H1 – Title of your Blog posts.
- One or two short paragraphs that introduce your blog posts.
- H2 – All subheadings and one or two paragraphs that summarize the subheading.
- Conclusion or takeaway
- Call to action (subscribe, read the full article, Like the video, comment, etc.)
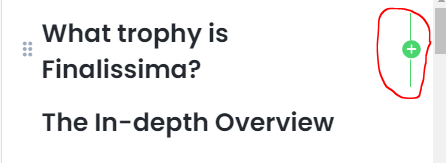
How To Add A Scene on Lumen5
To add a scene in Lumen5, click on the “+” button beside the text.
Watch the video below for a better understanding:
After adding all necessary scenes, next you need to add appropriate media.
Add Appropriate Media to Your Video
Although the Lumen5 AI would add media to each of your scenes but in most cases, they won’t be befitting enough.
So, you’ll need to add the most appropriate media to each scene by yourself.
Lumen5 has a plethora of images and videos from which you can choose. Also, you can download or create your own media and then add them to your video.
To add media to each scene in your video, click on “media”.
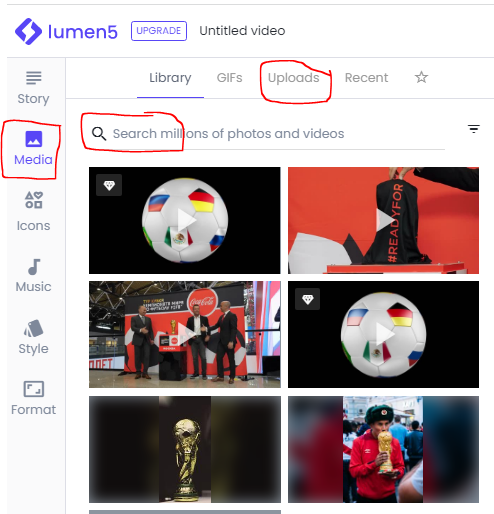
You can either search Lumen5 for videos, images or Gifs or upload your own media.
Other Important Things
Assuming you’ve added all necessary media to your video, there are still other important things to do. Consider some of them:
Edit and Format Video Texts
Feel free to modify the text in each scene. The shorter the better.
Also, you can customize the color and size of each text.
To modify any texts in the video, select the text and you’ll see options available.
Increase or Decrease Length of Scene
Depending on how long your text is, you can either increase or decrease the length of each scene,
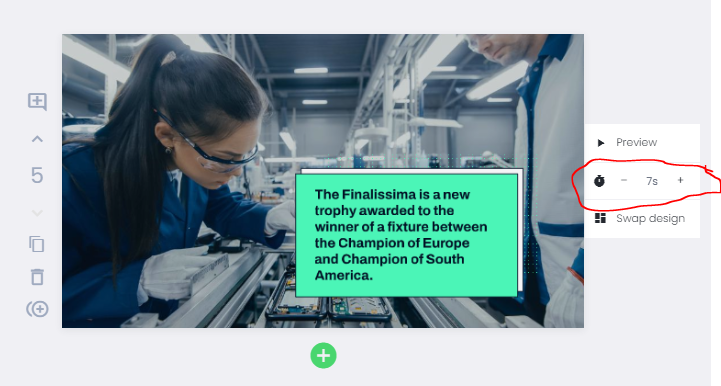
Try to make your scenes at least 5 seconds long (not 3). Depending on how long your text is, you could increase to 11 or 12 seconds.
Swap Design
If for any reason you do not like the outlook or design of a particular scene, you could change the look or design.
To do this, click the “swap design” right beside each scene.
Record Your Own Voice Over

Ok, this is totally optional. But if you think your video needs a voiceover, you can add one to your video on Lumen5.
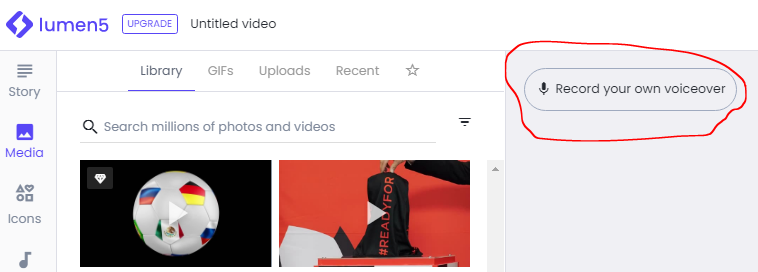
Simply click “record your own voiceover” at the top of your dashboard.
Add Audio
Your video is not complete without suitable audio.
Luckily, Lumen5 has many songs and soundtracks that you can add to your video.
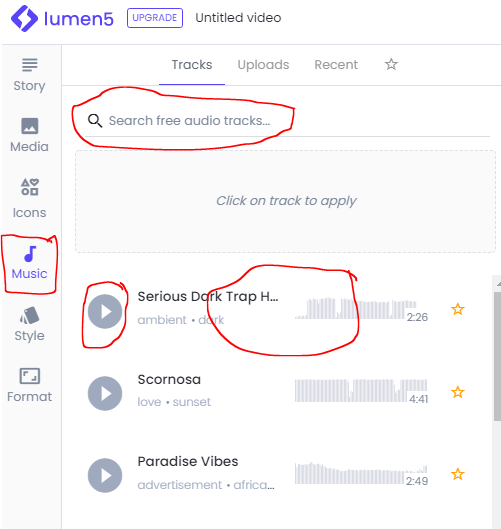
Simply click music on your Lumen5 dashboard then search for sounds based on mood or genre.
Then click the play button to listen to each sound.
Once you are satisfied with a particular sound, click on the tract (somewhere in the middle) to apply it to your video.
Note: Many of the songs on Lumen5 are not copyright-free on YouTube. You may need to change the audio if YouTube flags it as infringing on a copyright.
Preview
Before you hit the publish button, always preview your video.
It saves you a lot from mistakes that can be avoided.
Pro Tip:
If you are using the free Lumen5 version, your video would automatically come with the Lumen5 branding at the end of your video.
You can easily remove this branding with the online video-cutter tool.
Simply upload your downloaded video on the platform and cut out the last 3 to 4 seconds. That’s it.
Step 3: Publish Video
Once you’ve previewed your video and everything looks good, then click the publish button to render and download the video.
Share your video. Upload on YouTube and embed in your blog post.
Conclusion
If you want to scale your content marketing business, you should be creating and embed videos in your blog posts.
This article already explains the step-by-step process of how to convert a blog post into a video.
Take advantage of this method to start creating more videos.
Do not forget that embedding videos in your blog posts improve your SEO and average session time among other benefits.
Finally, I recommend that watch these 27 YouTube Channels often to learn A to Z of SEO.
